Avec optipng et pngcrush pour le PNG, et jpegtran pour le JPG. Before going any further and start writing the script, let’s make a first try with all of these tools starting with optipng:
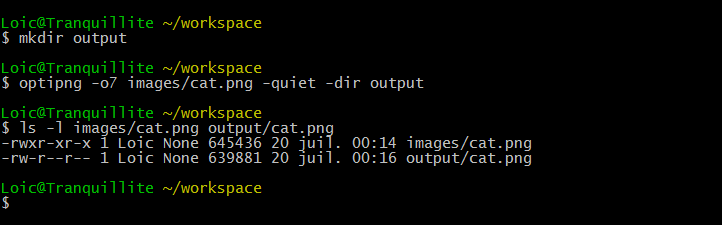
PNG optimization with optipng
Note: -o7 r force optipng to use the slowest mode. The fastest is -o0.
Then pngcrush:
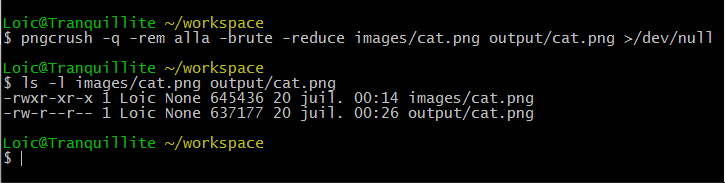
PNG optimization with pngcrush
And now a JPG optimization with jpegtran:
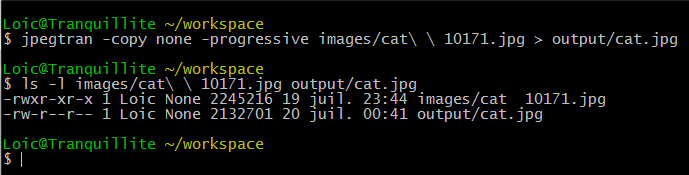
JPG optimization with jpegtran
Building the script
you can save it (optimize.sh) now from this GitHub gist.
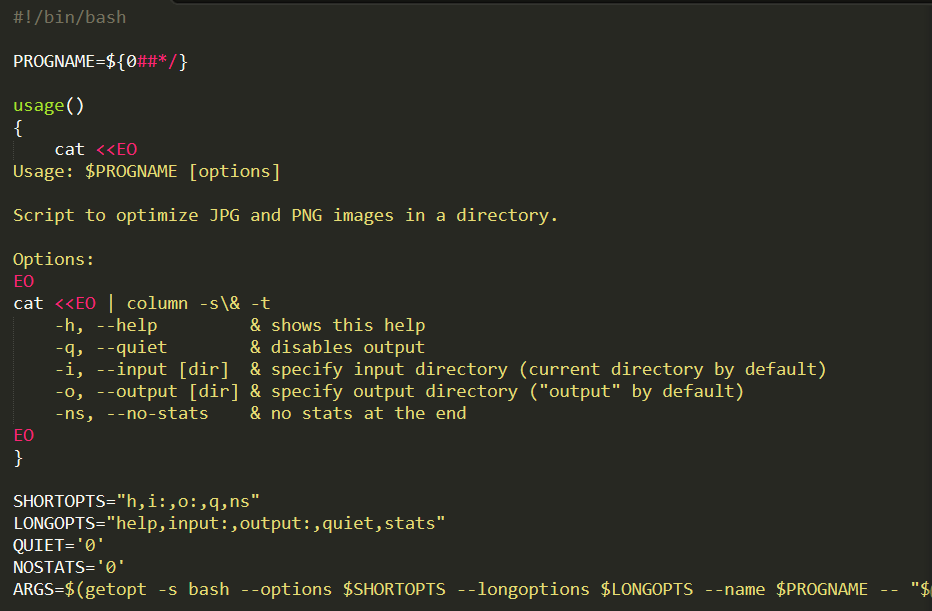
Options parsing
As obvious as it can be, our script needs some parameters:
-i ou --input to specify an input directory
-o or --output to specify an output directory
-q or --quiet to disable verbose output
-s or --no-stats to disable the output of stats after the run
-h or --help to display some help
There is a common pattern to parse script options, based on the getopt command. First, we create two variables to store both the short and long version of each parameter. A parameter which requires a specific value (for example our input and output directories) must end with “:”.

Bash script options
Then we are going to use the getopt command to parse the parameters passed to script and use a loop to call functions or define variables to store values. For this, we will also need to know the script name.
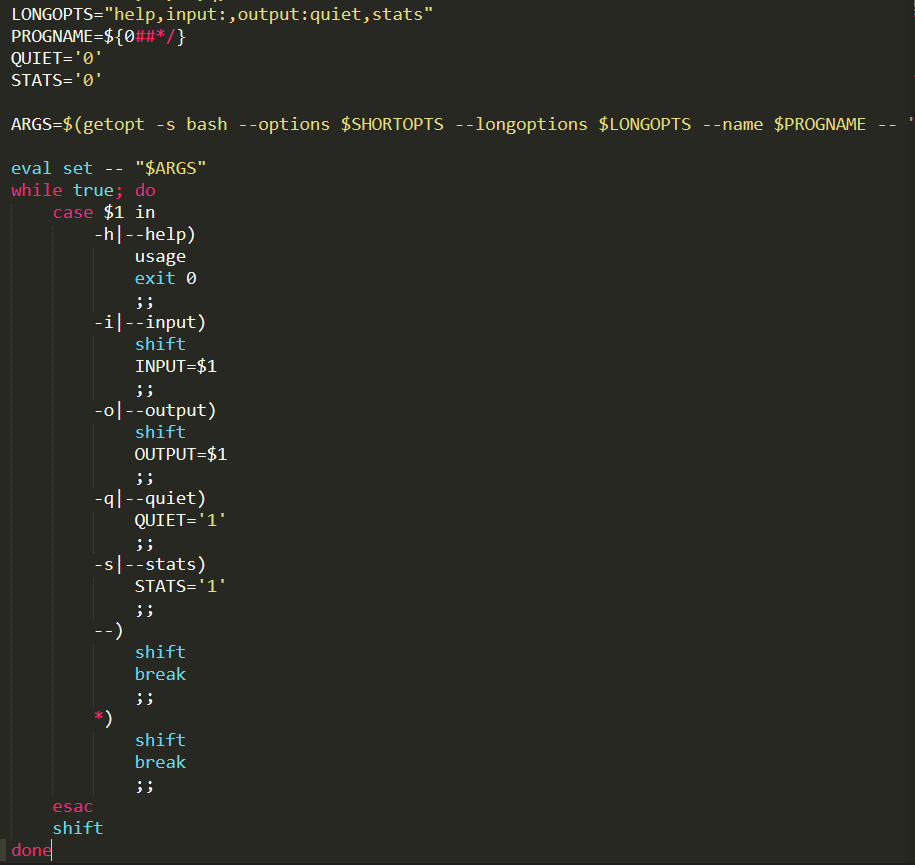 Parsing our options within a loop
Help function
Now, we have to create two functions:
- the usage() function, called in the parameters loop if there is a -h or --help parameter,
- a main() function which will do the optimization of the images.
To be called, the functions must be declared before the parameters loop.
 The help function
Let’s try our help function. To be able to run the script, we have to add execution mode (+x) on it with the command chmod.
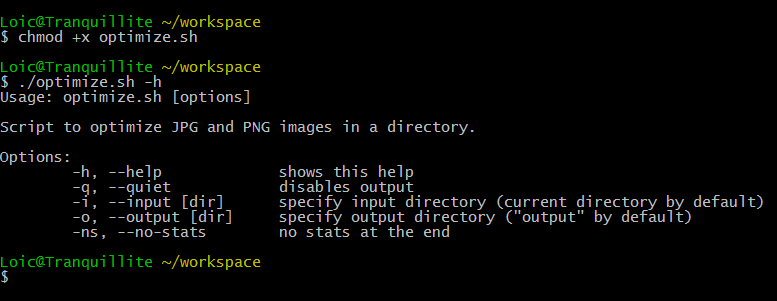
Help function. Pretty cool, isn’t it ?
Note, if you get a couple of errors like “./optimize.sh: line 2: $’\r’ : command not found”, you have to turn line endings in Unix mode. To do so, open optimize.sh in Sublime Text 2 and go to View > Line endings > Unix.
Main function
And now, let’s create the main function. We won’t deal with --no-stats and --quiet parameters for now. Below is the skeleton of our main function; it might looks complicated but it’s really not trust me.

The main function of our script
So our main function starts by initializing both input and output directories with passed parameters; if left empty we take the current folder as input and create an output folder in the current one (thanks to the mkdir command once again).
-p of the mkdir command forces the creation of all intermediate directories if they are missing.
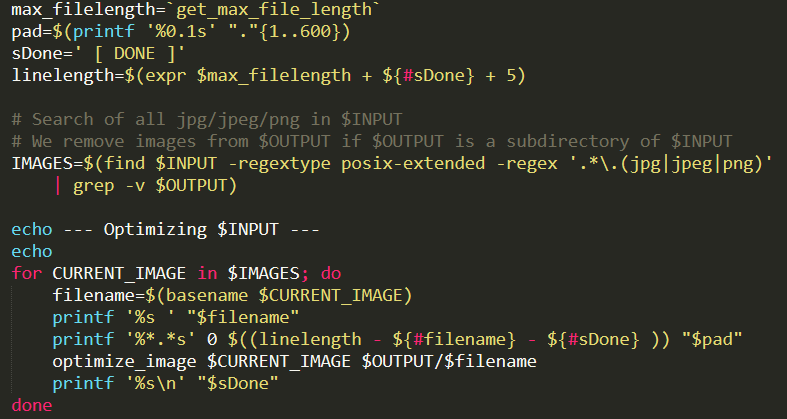
Once the input and output are ready, there is a little trick to deal with files containing spaces. Let’s say I have a file named “soft kitty warm kitty.png” (little ball of fur, anyone?), the loop will split this into 4 elements which will obviously lead to errors. To prevent this from happening, we can change the Internal File Separator (which is a space character by default) to set an end-of-line character. We will restore the original IFS at the end of the loop.
The image files are retrieved with the find command, which accepts a regular expression as parameter. If the output directory is a subdirectory of input directory (which is the case if we don’t specify any of both) and if the output directory is not empty, we don’t want to process images from here so we skip filepaths which contain the output directory path. We do this with the grep -v $OUTPUT command.
And then, we loop through the files and call an optimize_image function with two parameters: the input and output filename for the image.
Now, we have to create this optimize_image() method which is going to be fairly easy since we already have seen the command to optimize images before.
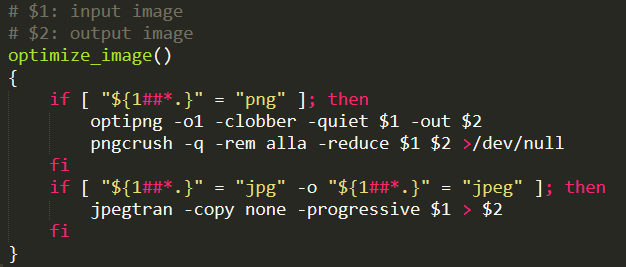
The actual image optimization function
Output informations
Let’s add some useful output to see progress and the final stats. What about something like this:
file1 ...................... [ DONE ]
file2 ...................... [ DONE ]
file_with_a_long_name ...... [ DONE ]
...
Would be neat, wouldn’t it? To do this, we first need to find the longest filename by doing a fast loop on the files.
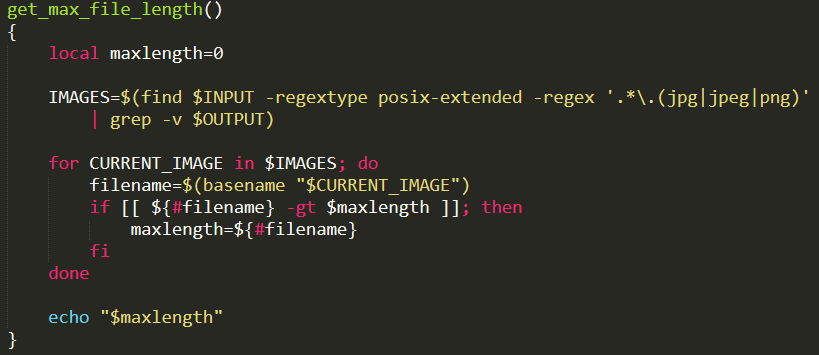
Function to retrieve the longest filename
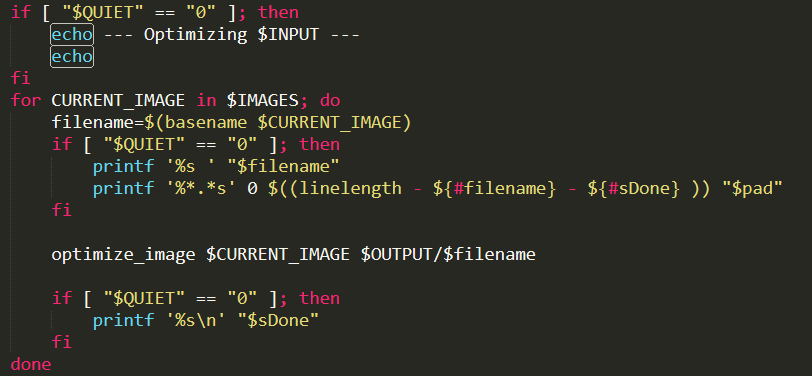
Then before our main loop, we:
-retrieve the length of the longest filename
-create a very long string of dots (”.”)
-set a max line length equals to the length of the longest filename + the length of our ” [ DONE ]” string (9 characters) + a small number (5 here) to have some space between the longest name and the ” [ DONE ]” string.
Finally, in the main loop we display the filename then the ”.” symbols and the the ” [ DONE ]” string.
Script handling the output
Let’s try it by running the following command:
# All parameters to default
./optimize.sh
# Or with custom options
./optimize.sh --input images --output optimized-images
# Or with custom options and shorthand
./optimize.sh -i images -o optimized-images
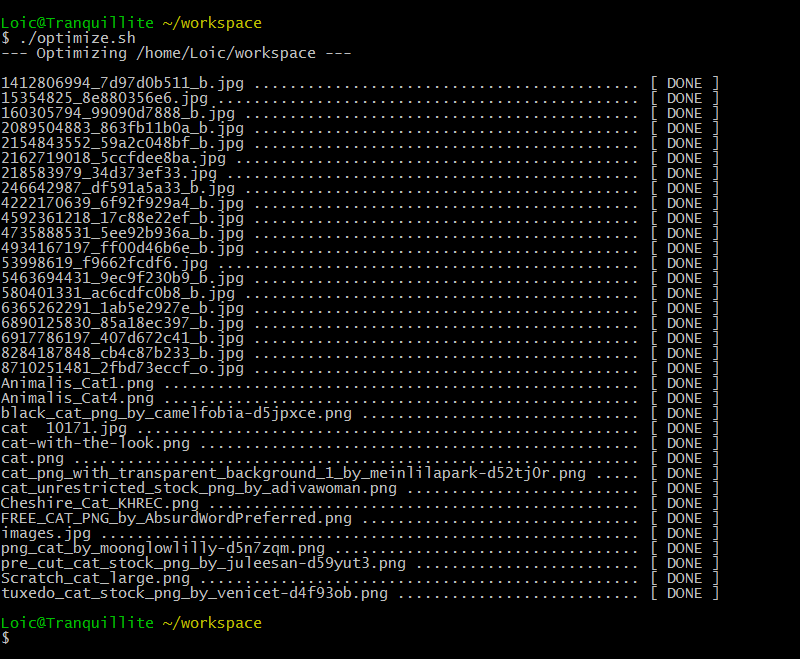
Testing the output
Final stats
For the final stats we are going to display the amount of space saved. The optimize_image()</code> method will increase atotal_input_sizewith the filesize of the image to optimize, and atotal_output_size` with the filesize of the output image. At the end of the loop, we will use this two counters to display the stats.
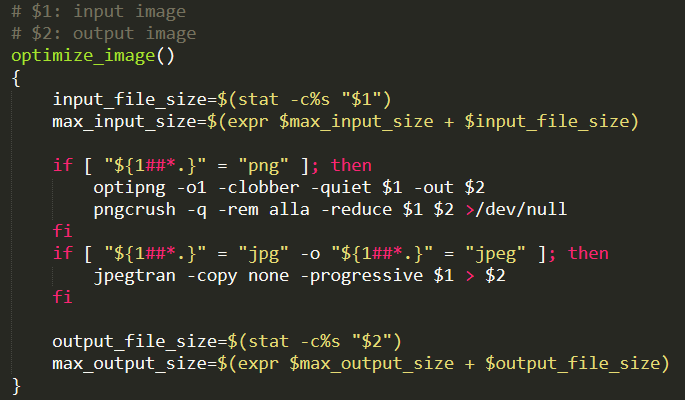
Adding stats output in optimize_image()
To display human readable numbers, we can use a human_readable_filesize() method, retrieved from StackExchange (let’s not reinvent the wheel, shall we?).
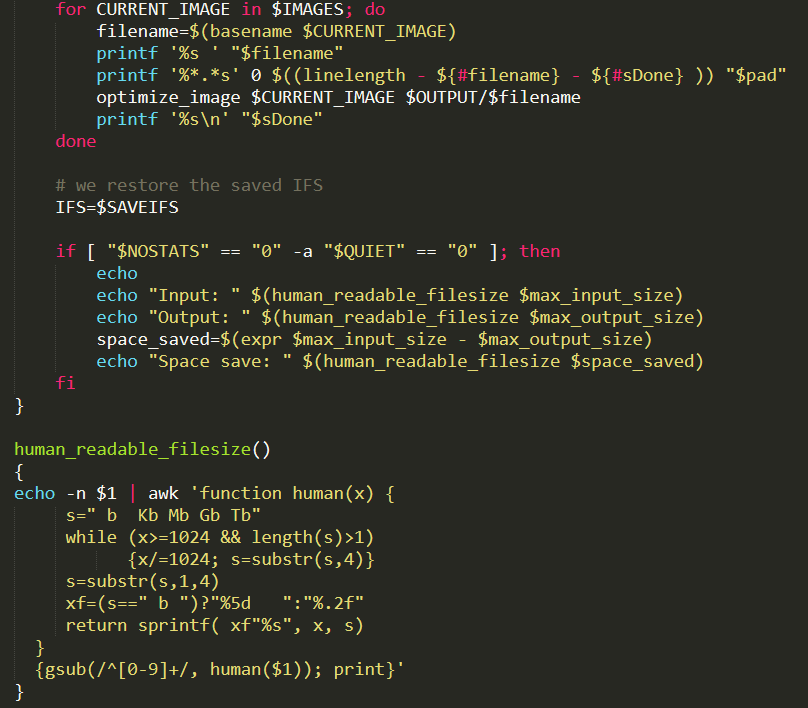
A function to display human readable stats
Let’s try it before adding the last bites to our code. Once again, we simply run ./optimize.sh (or with additional parameters if needed).
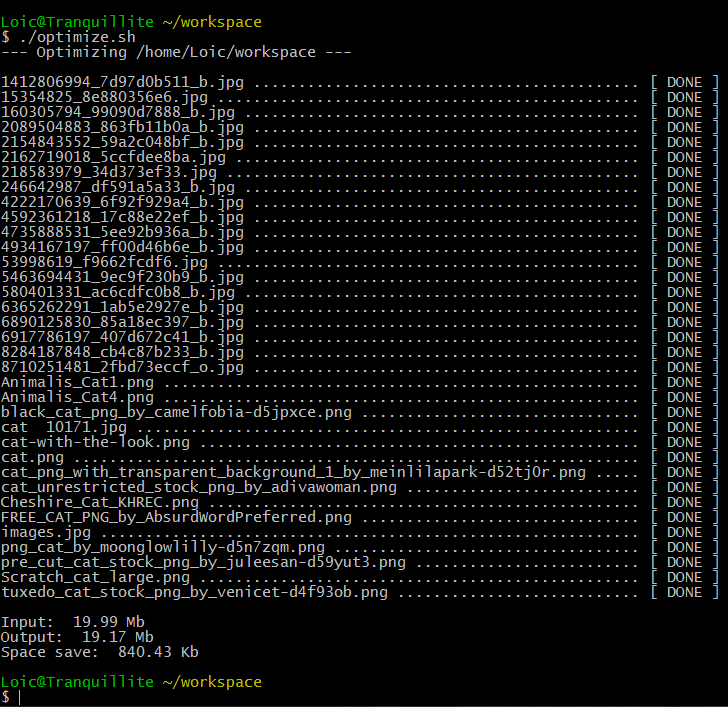
Outputing optimization stats
Keep it up people, we are almost done! We just have to display progress output if the quiet mode is off.
Quiet mode
Final result
Below lies the final script or you can grab it directly from this GitHub gist.
What now ?
Of course this is just a simple sample (no pun intended); there is still a lot of room for improvements. Here is a couple of things we could do to improve it:
-add GIF support,
-use other tools to optimize JPG and PNG in the optimize_image method (by the way, I highly recommand you to read this great article by Stoyan Stefanov),
-add a progress bar,
-try to add some lossy optimizations for JPG,
-add an auto-upload function to upload to your FTP,
-use a configuration file to tweak the optimization tools…
JPEG PROGRESSIFS
avec ImageMagick.
You can do a whole directory full of JPEGs like this:
mogrify -interlace plane *.jpg
Or, if you want to do one at a time:
convert input.jpg -interlace plane output.jpg
Or, if you want to do a whole directory and every subdirectory :
find . -iname \*.jpg -exec convert {} -interlace plane {} \;
jpegtran
On peut trouver un petit script sympa pour convertir les jpeg existant en jpeg progressif ici
une toute petite modification pour que les images ne ressorte pas en noir est blanc.
Installer jpegtran sur Debian Wheezy :
apt-get install libjpeg-progs
Placer le script de SebSauvage dans un fichier
nano /home/script-jpegtran.sh
Et on met le contenu de son script dedans :
#!/bin/bash
# Script original : http://orangina-rouge.org/shaarli/?YACP1Q
in_path=$1
out_path=$2
for i in $in_path/*; do
   out_file=$(basename $i)
   jpegtran -optimize -outfile $out_path/$out_file $i
   jpegtran -progressive -outfile $out_path/$out_file $i
   # Je commente cette ligne pour pas que l'image soit en noir et blanc.
   # jpegtran -grayscale -outfile $out_path/$out_file $i
done
Il ne reste plus qu’a lancer le script pour lancer la conversion de tous les fichiers jpeg du répertoire choisit.
sh /home/script-jpegtran.sh /home/images_originales /home/images_optimisees
Le premier répertoire est le répertoire qui contient vos jpeg d’origine, le second est le répertoire dans lesquelles seront les images optimisées.