Quelques logiciels payants :
https://www.plugin-alliance.com/en/products/spl_de-verb_plus.html
iZotope De-reverb
Acon Digital DeVerberate
Accusonus ERA-D
Mais il existe une manière gratuite.
Le secret tient dans l'inversion de phase/polarité et du compresseur.
Dans Cubase, l'inverseur de phase est le bouton (Ø).

Pour comprendre ce qu'est l'inversion de phase/polarité, voir cet article.
Voici comment faire dans Cubase :
On commence avec un Transient Designer (ex UA SPL Transient Designer ou STILLWELL AUDIO Transient Monster (1).
With these, we can tweak the Attack portion of a sound and boost it, and then separately attenuate the Release portion of the sound – the ambience. This is a bit of brute force, but it can work. But it’s not really De-Verb… so…
What we’re going to do is flip the phase of a second, duplicate channel, then change the audio on that channel, but only where we want sound to leak through (in this case, the Attack of the drum) – where the audio is that we don’t want (the reverberance of the room) , we’re going to leave that alone – the two channels will be identical at those points, will cancel out and be inaudible, The perfect tool for this?
Un compresseur. Ni plus ni moins.
when the sound is loud, we’ll compress the polarity/phase inverted channel (very heavily), making the two tracks different from each other which will allow the audio to leak through from the primary track. Between the hits, where the sound is quiet, the compressor will no longer be working, so the two channels of audio will be identical and will cancel out – no audio will be heard.
Les outils
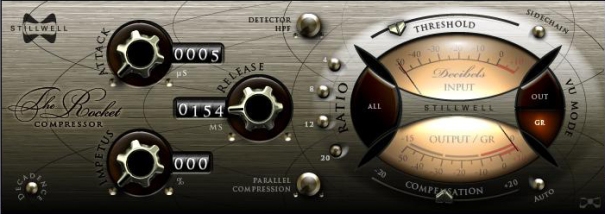
On va utiliser un compresseur (pseudo) gratuit – Stillwell Audio’s The Rocket.
Pourquoi? super fast Attack, reasonably variable release and huge compression ratios.
La Méthode
record Drums with full ambience – so it’s a really open recording.
On supprime les sons (noise gate) avant et après chaque frappe du Kick, Snare et Toms.
Très bonne méthode pour une prise proche des instruments, mais pas pour des overheads.
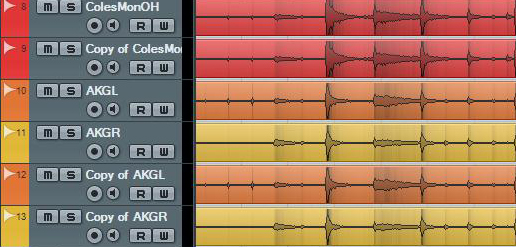
Step 1. Copier les Overheads.
Les OH ont été pris avec des AKG (L left et R right).
On copie ces deux pistes (Copy of AKGL, Copy of AKGR).
These tracks are identical. We’re also de-verbing the Coles 4038 Mono OH, but we’re just going to ignore that for the moment.
Step 2. Send your main pair of Overheads (AKGL and AKGR) to a Group Channel.
Here you can apply any EQ or Compression that you want on the original sound.
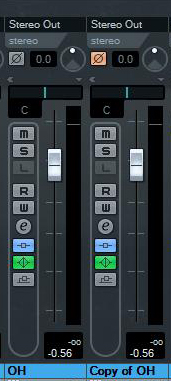
Step 3. Duplicate that Group Channel, give is a sensible name, and the route your COPY tracks (Copy of AKGL and Copy of AKGR in this case) to this new channel. This channel should sound Identical to your previous Group – Excellent!
Step 4. Click the Polarity/Phase button on the new Channel.
The sound from your Overheads should vanish. This is a good thing.
Step 5. most important step
it’s going to require a bit of tweaking, but I’ll give you a starting point.
Pop a copy of The Rocket in the last pre-fader Insert on the copied channel. If you’re not sure which that is you really should look it up – it’ll allow you much more flexibility in the long run. In Cubase 6 – that’ll be Slot 6. If you can’t find it out – pop The Rocket it in the last slot, and any time I mention mucking around with the channel volume – muck around with the ‘Parallel Compression’ knob in The Rocket – it’ll do the same thing.
Turn the Attack to its lowest setting (to the Left). Leave the Release quite high to start with (we’ll be tweaking that anyway – 500ms will do), whack the Ratio on 20:1, and then select the GR (Gain Reduction) Meter on the right. Now, drag that threshold DOWN. Really… DOWN. We want The Rocket to be hammering the audio. Don’t touch Detector HPF or Parallel Compression (previous note taken into account :)). What you should notice, if you play the audio now, is that you hear something. In fact, you’ll probably hear a lot. What’s happening is that, although the two channels are of inverted polarity/phase, the compressor is vastly changing the inverted channel making it different (and much quieter) than the original channel. They will no longer cancel out. We now need to tweak to get rid of the reverb.
The Gain Reduction meter should be flying to the left, and probably hanging around there. We don’t want that – we need to shorten the release time so the compressor recovers faster. We want the compressor to hit immediately a drum is hit (hence the short attack) but stop compressing during the ambience. For an extreme effect, turn the release down to about 50ms, then edge it back up until you get the kind of ambience reduction you’re after.
I went for fairly (2) subtle reduction on these tracks but you can take it a lot further. Here, try playing the two players in parallel (press play on the first, then play a second or so later on the second) and you can do a comparison. Back in your DAW, for a bit more ‘tweakability’, you could go more extreme on the overall settings and then blend it in more subtly by pulling down the volume of the inverted track in the Mixer. You may also find that in the mix, you can be more brutal with the effect… other instruments are great cover.
This also opens up a lot of different avenues. What if we start EQing portions of the inverted phase track – we could let more reverb through in certain frequency ranges. Here, we’re working with a classic style compressor – we have static attack and release times, and a variety of ratios to choose from. But what if we chose a limiter with program dependent release? What about the compressors with program dependent or interesting non-linear release curves? (3) What happens if you start mucking around with Transient Designers as well? In fact, on a later revision of this, we were using the Universal Audio SPL Transient Designer to tweak the release in the overheads and I’ve also had good results generally with Transient Monster – it really adds to the effect.
This method, as far as I can work out, is definitely one for punchy, short lived sounds like Drums and picked Acoustic Guitars. I’ve yet to try any commercial De-verb products, but I imagine they also struggle with long, relatively quiet sustained sounds with minimal dynamics. I can’t immediately think of any simple, non-spectral processing dealing with that (though I’m not saying it can’t be done… leave that to the fantastic mathematicians, engineers and theorists who work for these companies – hats off to those guys :)). Also, with this method, you can’t simply remove the ambience that is absolutely tied to the transients themselves – when the drummer hits the drums, the microphones _will_ pick up the room – we’re just hiding the effect of that in the ‘release phase’. But equally, try not to record in an environment which is unsuitable or un-adaptable for the sound you’re after.
Footnotes:
(1) If Stillwell or UA aren’t to your taste, or you want a Transient Designer which is totally free – try Flux Bittersweet 2. It’s a cracking plugin.
(2) Definitely a fast job here. I’m not totally happy with the release pattern on this recording, but as a demo, it works quite nicely. Can you hear the ‘mistake’?.
(3) Plenty of options here. On PC and Cubase – you should definitely try Variety of Sound ThrillseekerLA. It’s got everything we need. Cross Platform – how about Vladgsound Molot – absolutely love this compressor generally – great on the Drum Buss. Oh, and you might try FXPansion DCAM FreeComp – though this has program dependent release., it’s also a fantastic compressor. With all of these, turn off any saturation provided by the plugin first – it’ll muck around with your phase cancellation. Finally, there’s no harm in using a DAW bundled compressor… It’ll still work. I just liked The Rocket for this.
polarity inversionr as Pure Data would have it [*~-1]


